Activating the Offer Contract phase
Firstly you will need to ask your CSM to switch on the Offer Contract phase for your platform.
Please note: This is switched on for the entire platform and cannot be switched on for specific forms.
Once the settings are switched on and now visible on your platform, you will see these menu settings:

You will also now have the below steps in the Offer Phase:

These automated email templates will also be visible:

You will initially need to check the setting in the Offer Contract area.
Navigate to: Settings>Offer Contract
Offer Contract Settings

These settings in the screenshot above will need to be considered first.
- Bill Estimate Required - Turn this on if you will be sending an estimate of the bill with the Offer letter to the parents.
- Bill Estimate Frequency - This defines how the bill will be split. For example "Termly - same" will split the fees into three.
- Indicate if your school is eligible to offer the early years grant - If you switch this on, it will appear on the Bill Estimate as a sentence for them to contact the school about this. We do not do the calculation for this.
- Year groups where Early Years Grant can apply - Select the years that can apply for this.
- Offer Letter Checking - If ON then the offers cannot be made until manually checked and flagged as such.
- Maximum Bursary Change (%) - The maximum amount that a bursary can be changed after it is added in the concessions area of the student profile.
- Automatic Deposit Waiving - If this is OFF then deposits cannot be waived.
- Enable Assessment Import - This will allow the assessment results to be imported for the students. You can then use these for rankings in the next set of settings.
- Enable Offer Import - Turn ON to enable Offer Import options on the Data Import area.
- Allow both Staff Discount and Bursary concessions for one application.
- Boarder Status: Normal
- Boarder Status Full
- Boarder Status: Part time
Rankings
This is where you will be able to use the Assessment data that you can import. You will be able to rank the students based on their results.
Click "Add New"

Overall 1 - This property will be an average of the assessment scores. This will likely be the main property that the school will want to create the rankings.
Sort Priority - This will prioritise which of the criteria the school add and rank the students by this. The more
Column - This is the property that you are using to rank.
Sort Type - Ascending or Descending
Offer Configuration

The descriptions can be changed to appear differently on the Offer Tables.
Offer Status - These are the statuses of the offer:
- No Offer
- Offer Created
- Offer Approved
- Offer Made
- Accepted by Student
- Declined by Student
- Offer Withdrawn
Creating an offer email template
The email template you create will be sent to parents to advise them to sign into the platform to review your offer, if they are accepting, they will also be able to provide all required information and sign the necessary contract. They are also able to decline their offer within the platform if needed, which you will also be notified of.
1. On your platform within your required form, go to Settings>Application Form

2. Scroll down the page until you get to 'Phase: Offer' and select 'Step 1: Offer Letter'

3. Select the '+ Add Offer Template' button on the right
Please note: There are also settings in regards to your 'Decline Options' and 'Header & Footer' information here.

4. Here you are able to create and/or edit your Offer Template.
You are able to configure the template in various ways such as font size and style, alignment, bullets and numbering, text colour, etc. You are also able to use tokens which will cause the platform to fill this information in for you when sending an email to a parent (examples highlighted in yellow).
Once you are happy with your template, please select 'Save' at the bottom right of the screen

Creating an offer (individual and bulk)
Once you are at the stage that you wish to create an offer, you are able to do so following the below steps.
Individual Students
1. Navigate to the Student's Profile (you can do this by clicking on any page that the student's name is highlighted in blue, alternatively, you can select 'Registered Students' from the left side menu)


2. Click the large green 'Offer Status' button on the top right of the profile (which should currently say No Offer), then 'Create Offer' from the drop down that appears and finally click the name of the offer template that you created earlier.

3. A preview of how the offer will look to the parent/guardian will appear on your screen, here you can ensure that all tokens have worked successfully and that the offer displays correctly. If there are any issues with your template, please repeat the steps details in 'Creating an offer email template' to make any adjustments.
If you are happy with the preview, please click 'Create' at the bottom right of the preview window.

4. Once the offer has been created, this can be reviewed if required by going to the 'Offer' tab on the Student Profile. Here you are able to view exactly how the offer would look to the parent.

5. If you are happy with the offer that you created, once again, select the large green 'Offer Status' button (which should now say Offer Created) on the top right of the Student Profile and select 'Make Offer'. This will allow you to send an email to the parent to notify them to sign into the Admissions+ platform to review the offer and complete the next steps.

6. You will asked to confirm if you are ready to send notification of the offer as an email, once confirmed you will see a new window called 'Email Processor' appear, which will detail; who the email is coming from, who the recipients are, which template is being used (Make an offer to student), subject and content of your email.
Note: You are still able to make adjustments to the email at this stage if needed.

7. Once you have sent your offer email, you will see that the 'Offer Status' on the Students Profile has changed to 'Offer Made'.

Bulk
1. From your Dashboard, select 'Registered Students' from the left side menu, and select the section you need.

2. Once you see your list of students you are able to use the tick boxes on the left side of the table (first column) to select the students you're going to create or send the offer to (a menu at the top will appear once you tick a box).

3. Select 'Offer' from the top menu which will then show you your offer options. 'Create Offer' and 'Make Offer' will follow the same steps as detailed in the Individual Students option above.

Parents: Receiving an offer
When an offer is made to a parent, they will be notified of this via email which will prompt them to sign into the platform to reply to the offer and follow the next steps.
Below is an example of an email they will receive:

How parents open their offer
When you make an offer, the parent receives the "Make offer to student" email. This email contains a secure, one-click link that takes them straight to their offer and signs them in automatically, so they do not need to remember a password.
Ask the parent to open their offer using the link in that email, or to sign in to the account they already created during registration. Once they open it, they land on the Offer Letter step, where they can review the offer, accept or decline it, and then complete the remaining steps such as entering bill payer and bank details, paying the deposit and digitally signing the contract.
Make sure your offer email uses the "Quick Access Link" token
The one-click offer link only works if your offer email template includes the "Quick Access Link" token. Go to Settings > Application Form, open the "Make offer to student" email template and move to the Email Template step. Here you will see the personalisation tokens, highlighted in yellow, that the platform fills in when the email is sent.
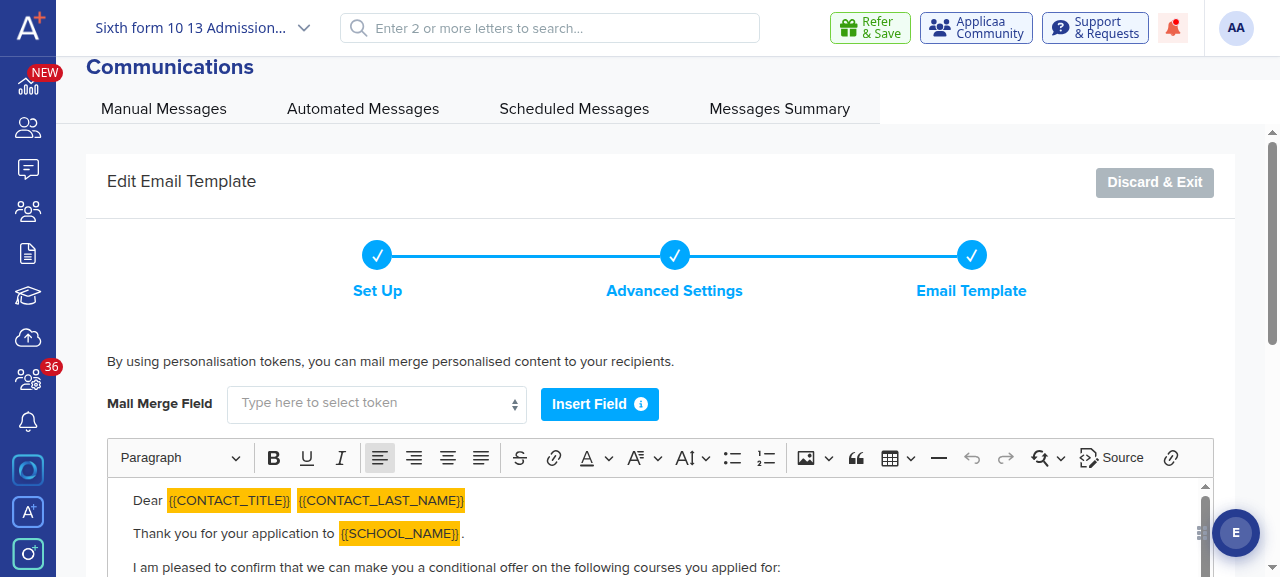
Check that the {{QUICK_ACCESS_LINK}} token appears in the body where you want the offer link to sit. This is the token that generates the secure link taking the parent straight to their offer.
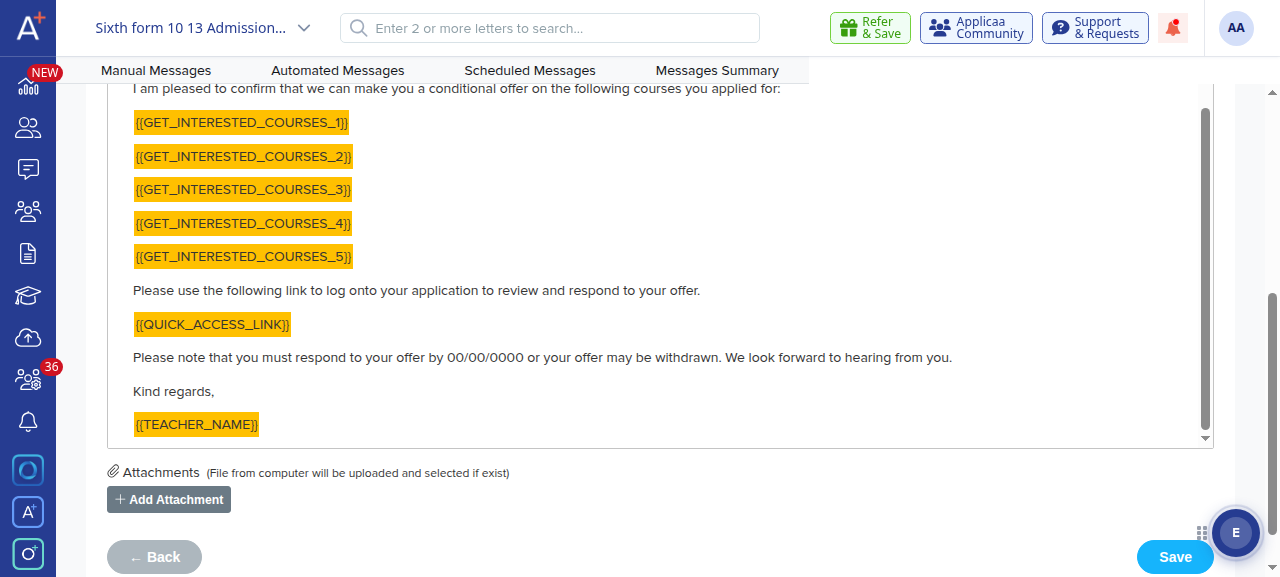
If you use the general {{LINK}} token instead, the email will only link to your platform's home page rather than to the offer, so the parent will not be taken to their offer.
Why a parent lands on the registration form instead of the offer
If a parent opens your general application link, the public link you share with new applicants, instead of the link in their offer email, they will be taken to the registration form and can start a brand-new application. They will not see their existing offer this way.
To avoid this, always ask the parent to use the link in their offer email, or to sign in to the account they already created, and make sure your offer email template uses the "Quick Access Link" token as shown above.
If the offer link no longer works
For security, the offer link expires 90 days after the offer email is sent, and it stops working once the offer has already been responded to or withdrawn. A parent who tries to reuse an old link will see a message that the offer is complete and can no longer be accessed.
If a parent received their offer some time ago and the link no longer opens it, re-send the offer from the student's profile by selecting the green Offer Status button and choosing Make Offer again, following the "Creating an offer" steps above. This generates a fresh link for the parent.